About
- TLDR;
- Motivation
- 3D simulation
- Modeling 3D enviroment in Blender
- Adding game controls in Unity
- Bridging simulation to browser (Unity-side)
- Client-side integration
- Loading Unity Script
- Bridging simulation to browser (browser-side)
- Answer simulation question
- Server-side API
- Request handling
- Machine Learning
- Data
- Training
- Results
- References
- Authors
- Frederick Roman
- Homero Roman

TLDR;
Navlead is an AI-powered assistant chatbot for navigation in 3D enviroments. The simulation, the chatbot, and their deployment online are all part of this project.
The simulation has custom 3D assets, a chat dialog box, motion controls and game logic. The chatbot has a custom ML NLP model that has a seq2seq architecture and was trained on CVDN dataset. The client-host loads the simulation and mediates its interactions with the API server. The API server authenticates the request and runs the ML NLP model.


Simulation

Front-end
(Browser client)
Back-end
(API server)
Machine learning
(Navigation guide)
Motivation
Inspired by the rise of VR and AI, this project aimed to combine both into navigation assistance system and run it through the browser.


3D simulation
Modeling 3D enviroment in Blender
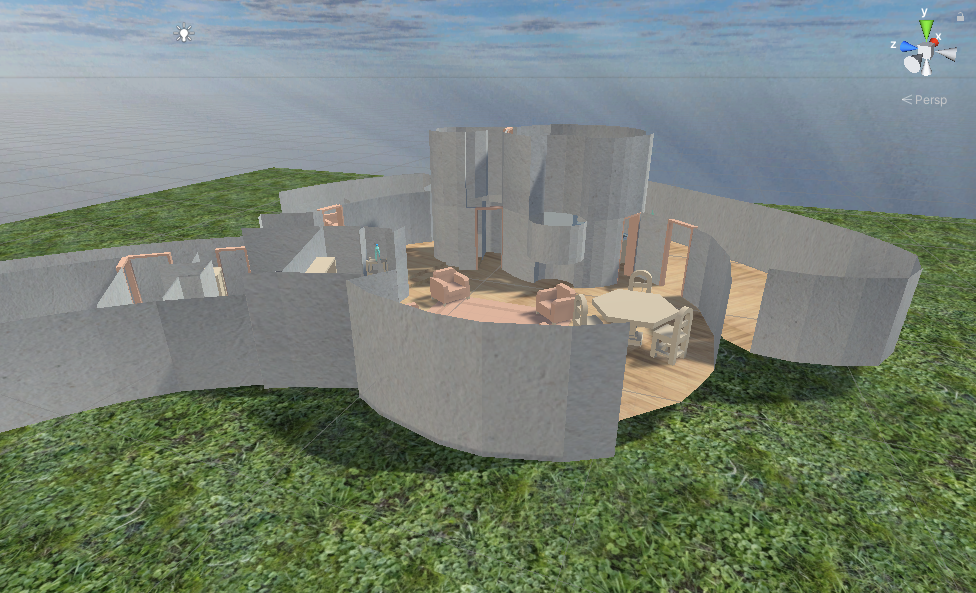
The 3D virtual enviroment used in the demo is based on Frank Lloyd Wright's final design: the Circular Sun House.

It is also known as the Norman Lykes House and it is located in Phoenix, Arizona. This is not typical house. Despite of its name, we think that the Circular Sun House resembles more a snail that anything else; with the head being the long corridor that links the suits of the private area, and the shell being the public area that has a kitchen and an office above it. Here is a tour of the house by Architectural Digest (and you be the judge):
So why did we choose this odd house for the demo? Simply put, we needed data to train the navigation AI and the CVDN dataset includes this house.
Now to the actual modeling.
First we had to decided how much of the house we needed (and wanted) to model. To that aim, we did quick a 3D sketch of the floor plan. We did the sketch with Voxeldesk. Voxeldesk is an online voxel-art editor thats makes 3D art (such as this sketch) easy to create, and it was developed by us too. So this is our first draft of the Circular Sun House layout.

Granted this is very rough sketch; but it got us to realize that we didn't need the exterior the house and even the ceiling. It also got us to realize that building such a curvy house would be too hard with voxels. Since we needed a bigger boat, we got Blender.
Blender is a free and open-source professional-level 3D editor with a strong community of developers. For these reasons, Blender is the main tool for modeling the 3D house in this demo. The walls, floor, and objects throughout the house are modeled in great detail using the power of Blender. We carefully placed the 3D objects in the house to match the locations shown in the CVDN dataset. This is how creating a bedroom in Blender looks like:
For navigation
• The doorways are marked and there are no doors
• The floor has a unique distinctive color so users can learn to distinguish walkable surfaces.
• The placement of the furniture avoid leaving tight spaces where you could get stuck.
For efficiency
• The house and objects are low-poly to optimize for space, download, and rendering time over the web.
• The underlying structure of repeated objects is linked, instead of copied, across these objects for efficiency.
This is how creating a bedroom in Blender looks like:

And this is how the house looks from above:
Adding game controls in Unity
Our simulation wouldn't be very useful, if we could navigate in the scene. For this we used Unity.
Unity is a cross-platform game engine that allows us not only to interact with the environment but also add physical properties such as gravity and rigid body collision. Below is a shot of what the starting room of the house looked like in Unity:

With Unity, we wanted to achieve two goals: add 3D motion controls and a 2D UI. The 2D UI would allow us to select a target and ask for guidance along the journey.
Motion Controls
For the player's movement, the player object has a script which updates the player's position based on the WASD keys. This movement is smoothed out over the frame rate at the Update runtime hook. The code for player movement is as follows:
PlayerMove.cs
Here _charController is the CharacterControllercomponent attached to the player object. This component allows the movement of the player to be constrained by object collisions and also to react to gravity like a rigid body.
Unity 2D UI
Navlead makes use of several 2D Panels overlayed on top of the display canvas. Each of these panels provides a visual interface to necessary functionality for the simulation. In total, there are 5 main simulation states as illustrated by the diagram below:

Before the simulation starts, the Splash Screen is active and shows the camera view of the living room as the camera looks around the room. Then, when the user clicks on Start, the Target Popup becomes active for selecting a target. Clicking on Ready starts the simulation and places the player at the start position of the Main Scene. From there, the player may open the Dialog Popup for asking questions or click on the reset button which will prompt the user to select a new target. Targets have triggers attached to them, so when a user reaches the desired target the Congratulations Panel congratulates the player and gives the option to re-start the simulation
In order to manage the state of the simulation, a central controller of type UIController has a reference to the UI panels and is able to open or close the panels according to different actions in the simulation. However, there is no explicit notion of a simulation state; meaning that the controller does not explicitly save what is the current simulation state. As shown in the diagram above, except for the splash screen, the panels can be opened from the main scene and can lead back to it.
The Splash Screen
When the simulation loads, the first screen that the user can interact with is the splash screen. This panel, branded by the Navlead logo, has a single button for enabling the user to start the simulation. The background of the splash screen demonstrates how the 3D environment will look like even before the user decides to click on Start. This rotating background is achieved by having a camera in the simulation rotate inside the living room.

As shown here, the splash screen camera has a fixed position but a constant angle of rotation demonstrating how it looks like to look around inside the living room. The splash screen panel is a 2D UI so the way that the camera view is loaded in the background is through a special kind of image called a “Render Texture” which, as the name suggests, is rendered at runtime.
The Target Popup
Once the user clicks on Start, the next panel that the user interacts with is the Target Popup. It is at this point that the user can choose the target for the simulation. Each target is shown as a rotating 3D object using the same “Render Texture” technique described above for the splash screen. The key piece of functionality of the Target Popup is the dropdown with a list of all the targets.

The Target Popup saves a private variable with the name of the current target selected. By default, the selected target is “Bed 1.” In order for this variable to be updated when the user clicks on an item in the dropdown, we attach a listener to the dropdown for the onValueChanged event. This way, whenever the user changes the selected value of the dropdown, the corresponding variable for the current target is also updated. Clicking on Ready at this point closes the Target Popup and opens the Main Scene.
The Main Scene
It is at the Main Scene that most of the action happens. Here the user is able to use the mouse or drag in a mobile device to turn around the place. Also, to be able to move, the player can use the WASD keys or the arrow buttons labelled with their appropriate keys.

The arrow movement keys are semi-transparent so as to not obstruct the view while still being big enough for a user to tap on them with their fingers in the mobile device. The Main Scene also contains a button on the upper left for resetting the simulation. This also has the effect of opening up the Target Popup since a target needs to be selected in order to start the simulation. The Main Scene also contains button on the upper right for opening up the Dialog Popup. It is at the Dialog Popup that the user can ask questions to the NavLead Net at any point during the simulation. The Dialog Popup provides a closing button for returning to the Main Scene so the user can continue the search for the target. When the player is close enough to the target, a corresponding trigger activates opening up the Congratulations Panel.
The Dialog Popup
The user is able to ask questions to the NavLed Net through the Dialog Popup.

This panel contain a text input field for entering questions. On a computer with a keyboard, the user can type their questions and then send them by clicking on the airplane-shaped send button. And on a mobile device the user can tap on the keyboard icon for opening up an on-screen keyboard to tap each letter at a time. Pressing enter on the keyboard has the same effect as clicking on the send button. Once the question is submitted, Unity sends the GameState to the front-end to request the Django backend for an answer. The area below the text input field shows the conversation history with the latest question and answer at the top. While Unity is still waiting for the response from the NavLeadNet, the answer has the placeholder of “… waiting for response …” As more questions and answers are added to the conversation history, a sidebar appears to allow the user to scroll down to older questions. The Dialog Popup can be closed by clicking on the X button on the upper right corner. Closing the dialog still preserves the conversation history in case the user still wishes to go back to it.
The Congratulations Panel
Finally, in order to notify the user that they have found the target, the Congratulations Panel is a semi-transparent screen that displays the message “Congratulations! You found the target!” and enables the user to go back to the Target Popup by exposing the Play Again button.

As mentioned above, this Congratulations Panel is activated whenever the player enters the trigger surrounding the target object. Each target has a trigger that can check whether the player has entered it. The code for doing precisely just this is as follows:
Trigger.cs
Triggers expose the OnTriggerEnter runtime hook that runs when the trigger detects that the player has entered it. In this code snippet, the trigger checks whether it is in charge of the current target. If so, it calls the UIController to display the Congratulations Panel.
Unity Keyboard
In order to enable mobile devices to input text in the Dialog popup, we implemented our own custom keyboard. This keyboard works with clicks, taps, and is able to scale with different screen sizes.

The way this keyboard is implemented is by having an input button for each key. A UI panel called “Keyboard Panel” acts as the parent of all the keys and has a list with references to all these keys. Each key can have one of three states and saves as a private string the value the key takes for each state. The Keyboard panel takes care of managing the state of the entire keyboard. The following is the script attached to each key:
Key.cs
As mentioned before, each key can have one of 3 states; the default, when the shift key is pressed, and when the numbers key is pressed. Upon awakening, each key makes sure to save a reference to its parent keyboard and its child text. When a key is pressed, the KeyPressed function sends the name of the key to the Keyboard parent for handling. The key also exposes functions for setting its text to one of the 3 states mentioned above. At the parent Keyboard, the ProcessKey function takes care of updating the state of the keyboard, adding or removing characters from the input field according to the key that was pressed.
ProcessKey.cs
The key <~ stands for delete and calls the RemoveInputChar function to delete the last character in the input field. The “shift” key prompts the keyboard to loop through the list of keys and call the function SetToShiftText to update each key to the shift state. Similarly, when the key ?12 is pressed, the letters in the keyboard are replaced with numbers and the ?12 key becomes the abc key for restoring the keyboard to its default state. The following image shows the keyboard in the state when the numbers key is pressed.

Finally, pressing enter has the same effect as submitting the question and closing the keyboard.
Bridging simulation to browser (simulation-side)
Now that we have a simulation, we need to publish it. And one way to do that is serving it through browsers.
Fortunately Unity can compile to run on web browsers. It does so by using WebGL and Web Assembly .Virtual and Augmented reality are two emerging technologies that greatly benefit of WebGL and Web Assembly for running applications on the web.
The compiled simulation will send and receive messages from and to the browser as follows:

When a user clicks the send button to submit a question, the OnSubmitQuestion callback is called. This function adds the question to the current list of questions. Then, it collects the state of the game in a data class called GameState. The GameState consists of the current question, the target, the location, and the direction vector of the player.
OnSubmitQuestion.cs
In order to send the game state to the JavaScript front-end for processing, the function sendGameStateToJS transforms the GameState into a JSON string representation and calls on the SendToJS bridge between Unity and the front-end.
sendGameStateToJS.cs
The bridge is written in “jslib” which stands for JavaScript Library and is a subset of the JavaScript language that Unity can expose to the rest of the C# code. Functions in jslib can access the browser window of a WebGL-enabled application and make calls to function in the webpage. It is through this ability that the “SendToJS” is able to call the processGameStateFromUnity function in the webpage front-end.
SendToJS.jslib
Once the game state along with the question has been sent to the Next.js front-end, the request needs to be processed, sent to the Django back end, and then the text answer needs to be sent from the webpage front-end back into Unity. In order for Unity to receive the answer, the game Controller exposes the callback “onAnswerFromJS(string answer)” which as the name suggests takes care of receiving the answer and instructing the Dialog Popup to update the list of questions and answers to include the new answer.
receiveAnswerFromJS.cs
Client-side integration
Once the simulation is finished, we must brought it to the browser. Since we decided to embed it in a full-fledge web site, we decided to choose a front-end UI framework. We chose React. React is a free and open-source front-end JavaScript library for building user interfaces based on UI components.
Bridging simulation to browser (browser-side)
After we built the Unity simulation (with the official WebGL template), we stablished the communication between it and the browser by passing and receiving messages through the window object. We accomplished that by adding the following lines to script.js (Unity's bootstrap loader).
script.js (inserted lines)
Loading Unity script
To run the Unity simulation in the browser, we must first load the Unity bootstrap loader script (script.js). We accomplish this by appending the script asynchronously to the document's body when the Simulation component is mounted (as suggested by this article).
Since the Unity bootstrap loader script appends the simulation build scripts, we should remove them when the Simulation component is unmounted. We can implement all that in the following custom React hook:

useLoadUnityScript.tsx
Answer simulation question

When the user (traveler) asks for navigation guidance, the inquiry itself is sent to a remote ML API service through the NavGuideService.
useNavGuide.tsx
Server-side API
Request handling
The NavGuideService acts as a proxy that sends a request like this to the ML REST API server:
POST /navigationGuidance

Body :{
  Traveler: {
    Question: string;
    Target: string;
    Location: {
      x: number,
      y: number,
      z: number,
    }
  },
  ...,
  API_key: string
}
After validation and authentication, it runs NavleadNet to infer the answer to the traveler's question given his/her location and target. The response looks as follows:
Response :{
  ...
  answer: string
}
Machine Learning modeling
Data
Base dataset (CVDN)
NavLead is trained using the text dialogues from the CVDN dataset. CVDN is a dataset of more than 2,000 human-human dialogs situated in simulated, photorealistic home environments. In each dialogue, 2 people work together to reach a target. The first person is the Navigator and can move around the 3D environment as well as ask questions to the Guide. The Guide is also a person, and observes the 3D environment through the screen of the Navigator, but unlike the Navigator, the Guide does not interact with the environment. Instead, the Guide has access to pictures of the environment along the next steps along the shortest path towards the target. The Guide’s role, then, is to provide good answers to the Navigator’s questions, so the Navigator can reach the target as quickly as possible. The video below shows a full demo of this interaction:
The following is an example of a single question-answer exchange with “picture” as a target:

Augmenting dataset (CVDN)
In order to generate more data for training, the CVDN dataset is augmented during training with paths having random start and end locations. On each training iteration, we train once with the augmented data and then with the original data point. The augmented datapoint is generated by taking the original datapoint at that iteration and randomly selecting a location with a target in the same environment and then randomly selecting a starting location. Non-connected locations are excluded. Once start and end locations are selected, a set of text instructions is generated from the shortest path by mapping the movements from location to location to the closest cardinal direction. The possible set of generated instructions per step is illustrated in the following diagram:
Diagram showing the mapping from vector direction to word instructions (relative to the traveler)

Synthetic dialog creation for random initial location and target
Continue forward
Continue forward
Continue forward
go to your left
go to your right
go to your left
go to your left
Training
Architecture (seq2seq with attention using LSTMs)

For training, NavLead takes in as input the question as a string of characters along with the coordinates and direction the Navigator is facing when asking the question. Then, NavLead outputs a sequence of words that correspond to the inferred answer. The way NavLead achieves this is by training a sequence-to-sequence (Seq2Seq) machine learning model. Seq2Seq takes in a sequence and outputs other sequence. It is typically used for language processing and some applications include language translation and conversation generation. NavLead in particular implements a Seq2Seq with attention using LSTMs. LSTM stands for Long Short-Term Memory and is especially powerful for processing long sequences of data like the words in a conversation. The way this is achieved is by outputting a context vector on each step of the inference. The context vector from the previous step is then used to infer the next word.
Understanding the encoder-decoder sequence to sequence architecture
In particular, NavLead implements a Seq2Seq model in two main parts. The first part is called the Encoder and has the task of representing the environmental context. For NavLead, the environmental context is the question asked, the position and direction of the Navigator and the features describing the next 5 steps along the shortest path. The encoder generates a representation by mapping these values into a context vector. This is achieved through an attention layer between the features describing the Navigator along with the question and the features describing the next 5 steps; which is then followed by a bidirectional LSTM cycle. In short, the encoder maps from the question and the environment features into a context vector that will later be used to initialize the decoder. The following diagram represents the Encoder:

With the context vector, the decoder now has information about the question, location, target, and the next 5 steps which it can use to generate the answer. To accomplish this, the decoder uses another cycle of LSTMs with attention where the attention layer captures the relationship between the context vector and the and the last word to generate the next word. The cycle starts with the <BOS> tag which stands for “Beginning of Sentence” to indicate that we are starting a new inference. The inferred word is then used as input to predict the next word and so on until the decoder predicts the <EOS> “End of Sentence.” The following diagram represents the decoder:

Training Configuration
NavLeadNet is written in Pytorch. Pytorch is an open source machine learning framework
NavleadNet has a sequence-to-sequence architecture with:
| Optimizer | RMSprop |
| Learning Rate | 0.0001 |
| Dropout | 0.5 |
| Loss | Cross entropy with teacher forcing |
The loss function used is Cross Entropy with Teacher Forcing where a good text answer is that which is as close as possible to the text answer provided by the human Guide. For example, for a vocabulary of 4 words [left, right, up, down], an untrained model would predict uniform probabilities of [1/4, 1/4, 1/4, 1/4]. With teacher forcing, a single word would be the correct answer, let's say in this case the word “right.” This means that the correct distribution is [0,1,0,0]. Therefore, the cross-entropy loss for this toy example would be -0*1/4-1*1/4-0*1/4-0*1/4 = -1/4 Since the goal is to minimize the loss, this has the effect of favoring predictions where the model is more confident of the right answer.
Training loop
The CVDN dataset is split into 1299 training, 94 seen validation, and 260 unseen validation dialogs. And, as mentioned above, data augmentation is performed at runtime interleaving training of augmented data with the original data at each iteration. The function trainVal contains all the necessary steps for training and evaluation as follows:
trainVal.py
Here WorldCollection refers to a data structure for storing information about each house in the CVDN dataset. The basic steps performed in trainVal are those of initializing the training environment, loading the houses into the WorldCollection, loading the dialogs with help from the DialogBatcher, reading the vocabulary for the tokenizer, and finally calling on trainSpeaker with all these information to run the training loop for NavLead. More in detail, the function setup sets the random seed for all random number generators used. Also, the WorldCollection is a class that contains a dictionary that maps from world id to an instance of a World. Here houses are referred to as instances of the World class. Each World is simply a collection of information about a particular house:
World.py
The two most important pieces of information that the World holds about a house is the name and the viewpoints in that house. While the 3D space in the house is continuous, the CVDN dataset divides up the areas in the house into discrete locations called viewpoints. For instance, the entrance to a room can be a viewpoint. Each room can potentially have multiple viewpoints, so it is common for a house with many rooms to have hundreds of these viewpoints. In order to organize the information about each viewpoint, they are saved as instances of the Viewpoint data class.
Viewpoint.py
As shown here, each Viewpoint contains information about its location in 3D space and a list of neighbors as well as targets at that location. Of these, the list of neighbors is critical for being able to determine the path between two viewpoints. For example, when doing data augmentation, a function called getShortestPath runs Dijkstra algorithm and returns the list of viewpoints to traverse in order to reach the end viewpoint given a start viewpoint. Moreover, each viewpoint instance records the names of the targets at that location. Targets are recognizable 3D objects like a bed or a plant. A room may contain multiple targets or no targets at all.
Looking back at the trainVal function, as was mentioned before, the DialogBatcher is a data structure that stores a list of dialogs for a particular set of houses. Since the training and validation sets are two separate sets of dialogs, an instance of DialogBatcher is created for each. The dialogs themselves are organized by the Dialog data structure as follows:
Dialog.py
In a few words, a Dialog consists of a question, an answer, the world id and viewpoint where the question was asked along with the target and optionally the next steps taken towards the end viewpoint with the target. The Dialogs are extracted from the question-answer exchanges in the CVDN dataset when the DialogBatcher is instantiated.
Then, when the trainVal has loaded the training data and validation data, trainSpeaker takes care of actually running the training loop to train the NavLead neural network to produce answers from questions.
The full set of steps for training can be found in the trainSpeaker function as follows:
trainSpeaker.py
The training of NavLead can be divided into 3 main parts.
1. Instantiation and setup of the model.
2. The training loop at each interval where we interleave training of the CVDN data with data augmented online at each iteration.
3. Validation at the end of each interval.
On the first part, we create an instance of Speaker and assign it the worldsCollection environment.
trainSpeaker.py (part 1)
As mentioned above, the Speaker class is a sequence-to-sequence model that takes in as input a text question and outputs a text answer. Under the hood, it is implemented as an encoder-decoder network. At each step, when walking inside the house, the encoder encodes the 3D location, the direction, the mobility, the targets nearby, the requested target and finally the question into a context vector. This context vector is then used by the decoder to produce the text answer on word at a time. The direction is represented a 2D unit vector whose origin is the current location. The mobility refers to 8 Booleans that indicate for each cardinal direction whether or not the player can move in that direction (North, South, West, East, Northwest, Southwest, Southeast, and Northeast). For instance, if all Booleans are true, then that means that the player can move in all directions. In order to determine whether it is possible to move along a cardinal direction, we loop through the neighboring viewpoints calculating the direction vector from the current location to the neighbor. With this, vector we can determine which is the closest cardinal direction that matches this vector by comparing the angle between the vectors. The class method getCardinal Direction AlongVector takes care of this task as follows:
getCardinalDirectionAlongVector.py
The idea is that using the dot product we can extract the angle between the direction vector and a cardinal vector. If we compare against all cardinal vectors we can decide which is the closest cardinal vector and hence decide what direction the player is able to move from a location.
Going back to train Speaker, on the second part we have the bulk of the training. At each iteration a random batch of dialogs is selected for training using the get Random Batch function provided by the Dialog Batcher As mentioned before, on each training step, the convert To Step By Step Instructions takes in the current dialogs and generates new step-by-step instructions between 2 random locations in the same house as the training dialogs. These augmented dialogs are used for training before training on the real dialogs at each iteration.
trainSpeaker.py (part 2)
Then on part 3, at the end of each interval, the model is evaluated on a set of random dialogs from the validation set. The BLEU score, loss, and accuracy are calculated using these validation dialogs. The BLEU score is a metric typically used in machine translation for comparing 2 text sequences. In our case, it is used to judge how close the generated text is to the reference human text answer. The BLEU score itself computes the modified precision metric using n-grams instead of matching word by word between the 2 sentences.
trainSpeaker.py (part 3)


